Inside Phil's Bunker
Plyometric Boxes

Plyometric step boxes are great for exercise programs. A friend of mine and I made a couple of sets. He is a personal trainer and uses his set every day. They have held up well over the last 6 months. The ones I kept see steady use and are in great shape. The smaller one, 6 inches high, is open on the bottom and the larger one is closed, meant to be used for 12" and 18" steps. We used a non-skid surface on the sides that are to be stepped on. More on this in a bit. A note on terminology, I use the term "tail" for the notches and "pins" for the tabs that go into the tails.

The order of of operations used to make these boxes is
1) build router jig
2) cut plywood blanks
3) mark, trim and rout tails on top and bottom pieces
4) mark, trim and rout pins on longer side pieces
5) mark, trim and rout pins on remaining side pieces
6) cut/rout handles
7) prepare for assembly (sand, fit, adjust, test clamp...)
8) glue up
9) trim pins/tails
10) make feet on small box
11) finish and add non-slip pads
Construction with 3/4" Baltic Birch is fairly simple, effectively using box joints, though with really wide pins and tails. I made the pins 8" wide and centered them. Study the exploded view to see how it interlocks. I decided to create a router jig to make the pins/tails so as to get them extremely precise. See the drawings at the end of this article. The jig is essentially a box that I could clamp a work piece to and route out the pin or tail on the edge. One side is for pins and the other is for tails. I used 3/4" MDF. Before routing the pins/tails on the jig, I trimmed off the waste on the work pieces using a band saw, leaving 1/8" material. This made the router's job a little easier. I initially used a center line to align the work pieces in the jig. However, minor errors added up quickly and found it better to mark the edges of the pin/tail joints and align by making your marks equidistant from each side on the tail/pin edge on the jig. If you make the jig, be sure to make the holes to clamp the work piece. Clamping the work pieces to the jig reminded me that I need 3 hands and having the clamps pre-positioned in the holes makes it a lot easier. I designed the jig to use a guide bushing on my router with a 1/8" offset (1/4" bit in a 1/2" bushing). If you want to use a different offset, you will have to adjust the jig dimensions. See the drawings at the end.
I cut the tails about 1/16" more than the plywood thickness so they would stand slightly proud. This allowed me to trim route the excess and get a completely flush fit. The shop drawings shows 11/16" but measure the thickness of your material and add 1/16" to get the correct depth of cut for your router bit. After final assembly and glue up, I used a trim bit in a router to clean them off flush. You can hand rout them if you want but I found it easier and less error prone to use a router table. A little bit of sanding and the joints came out really nice.
It took a bit of head scratching but the best order for cutting the pieces is cut the tails in the tops and bottoms first. Then, do the sides that run the full length of the top. Find and mark the edges of the pins (for aligning in the jig) and cut the pins. Then assemble the 4 cut pieces and clamp them square in the center (ie, don' put pressure on the ends). Check for proper fit of the last two sides and trim if necessary. Then align to find and mark the pin edges and cut those pins.
A note on assembly. The big box takes a huge amount of glue and you will need to move fast. I found it best to do a full dry run with the clamps and marking each edge pair so there is no confusion during final assembly. Check to make sure there aren't any gaps. Make sure the joints aren't very tight during dry fit as the glue will expand them enough to present a problem during glue up. Really tight joints will be extremely hard to get seated. If they are tight carefully sand the pins down a bit. Note that you will need a lot of clamps for the big box, I used 20 to get everything tight.

The handles were made with a router template because I was making 8 hand holes for the two sets and wanted them all to be uniform. I cut the template on my CNC machine but they are easy enough to make with a Forstner bit and a jig saw. See the drawing for dimensions. I used a guide bushing on the router so the opening is 1/4" over sized. Adjust the template (or bushing) size if you are are doing it differently, with a pattern bit, for example. Drill out most of the waste material with a Forstner bit, double sided tape the template and route the opening. I rounded the edge of the handle holes with a 1/4" round over bit. Be sure to do that before you glue up. Don't ask me how I know this.
Note that you don't absolutely need to make a handle template as they can be cut directly in the sides. The shop drawings show the actual handle measurements. I'm a bit of a perfectionist so thus the template.

The feet for the smaller box were also routed with a template. It is straightforward to make the template by hand so I don't have drawing of it. Also, there are lots of ways to make the feet without a template. If you use a router, be sure to remove as much waste material as possible before routing and take very shallow cuts to avoid tear out. Plywood, even the best Baltic Birch, is notorious for that.
The non-slip treatment was fun to figure out. There are lots of products out there you can use but I was unimpressed with most of them. One product that caught my eye is SoftSand. You can google it. It's essentially granulated rubber. I used medium grit . Basically, you paint your area with what ever you want and then sprinkle the SoftSand on it. Let it dry and brush off the loose material. Then cover it with another coat of paint. We settled on battle ship grey marine deck paint and grey SoftSand. Good quality paint that goes on thick is crucial to get good results. Sprayed the boxes with spar varnish, two coats. Once dried, I used blue painter's tape to mask out the area, used a corner template with a knife to lightly cut the rounded corners and then peeled the inside part off. I used a tight nap roller to lay down a thick coat of paint and then sprinkled the SoftSand fairly liberally. Dried it over night, swept it off and then put on the top coat of paint. I was a little nervous about peeling the mask off but it broke cleanly along the tape edge without a need to score the line. I'm very happy with how it turned out. The non-slip pad looks substantial and professional to my eyes. It's held up flawlessly in 6 months of use.
At the end you will find shop drawings for the boxes and template.

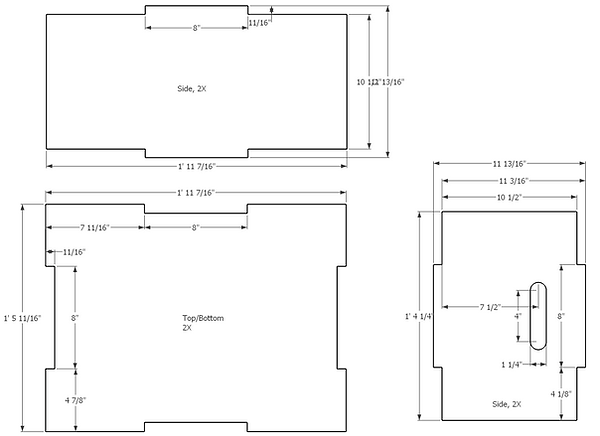
12" x 18" Step Box Shop Drawing

6" Step Box Shop Drawing

Box Joint Jig Shop Drawing
