Inside Phil's Bunker
Sanding Blocks
Recently, I took a finishing class and was reminded how important good sanding blocks are. The nice ones go for $20 (preppin weapon, for example). I want to have lots of blocks with different grits and at $20 a pop that adds up fast. There are lots of cheapo and, IMO, not that usable ones for low prices. So, I decided to make my own. After looking at various ideas on the internet, I decided to design it myself, too.
Key requirements:
- must fit in my hand comfortably (I gots da ar-tha-ritus)
- must hold the sandpaper tightly
- must use 1/4 of a standard sandpaper sheet
- must be easy and quick to load paper
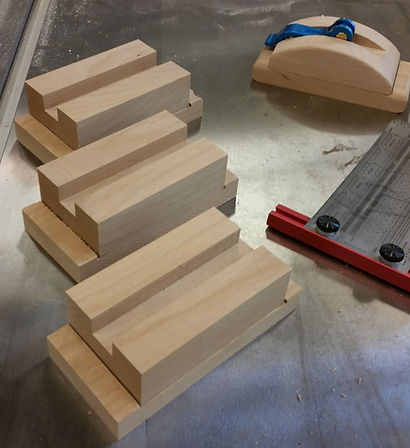
After a few tries, I came up with this design. I used a Rockler cam clamp (2 for $10) and designed it so when you close the cam, the sandpaper tightens up. You can get 4 strips from a standard sandpaper sheet. I was concerned about the cam lever being uncomfortable on my hand. That didn't turn out to be the case for me but if it bothers you, turn the sanding block so the lever points forward.

Materials:
-
wood - any scraps will do. you can use pine/fir or hardwood. 2x4 stock would be ok. The base dimensions are critical to fitting a 1/4 sheet strip.
-
Rockler 1/4"-20 cam clamp. part number 58244. Other cams will work but adjust the width of the dado.
-
1/4"-20 2" bolt or screw.
-
1/4" washer.
-
cork or rubber matting for the bottom of the base.


Steps
Cut the blanks for the base and clamp.

Route out the base tray for the clamp. The clamp block needs to be a little loose in the tray. Start with it too tight and sand the ends of the clamp block when assembling.

Route out the dado for the cam lever in the clamp. If you are making multiple, you might want to route the dado before cutting the individual blanks.
Route the round over ends of the base using a 3/8" round over bit. Use a backing block to prevent tearout.


Drill the holes in the following order: drill a pilot hole through both blocks (hold together with tape or a clamp to ensure alignment), drill out the 3/8" hole for the bolt/screw head (verify depth, the head must be at least 1/16" recessed) and then drill the 1/4" hole through both base and clamp.
Cut the rounded surface of the clamping block. If you don't have a bandsaw, you can use a large round over bit in the router to ease the edges. The clamp block needs to feel comfortable in your hand. Sand, sand, sand. Hold it in your hand - sand off any sharp edges. Think comfort. Ease the edges of the hole on the bottom of the base.
-
If you want a softer base, add cork or rubber matting to the bottom of the base. Cork drawer liner works quite well.
-
Now is a good time to tune the clamp block. Sand the ends of the clamp until the gap between the clamp and tray is slightly less than twice the thickness of the sandpaper you are going to use.
-
Use a 2" 1/4-20 screw, insert through both base and clamp. Hex bolts aren't good because they are hard to tighten. Screw the bolt into the cam. Close the cam and tighten the bolt so it's finger tight. The thickness of the sandpaper will make it tighter. Test the cam for tightness. I generally make it a little extra tight because the wood will compress a little bit with use causing the cam to loosen up. When the cam is open, you should have about a 1/16" gap between the base and the block.
There are a number of variations on the base that are worth considering. I use the first one for highter grit paper when sanding between coats of finish. It allows me to get into corners a lot better.

